I tried caustics before, but this time I wanted to experiment with something I'd never done - diffraction. More specifically, how light splits at angles producing gorgeous colors. UE4, unfortunately, has one major limitation on this for light functions:
- Only single channel can be used for light, single color
- Possible to use 3 light functions (RGB), but shadows must be calculated for all 3
Decals also have other issues:
- Applied to backfaces (does not respect shadows or occlusion at all)
- Can't access G-buffer or surface normals (no way to assign proper occlusion terms or physical behavior with different materials)
And hard-baking into materials presents its own challenges as well:
- Caustics material function required for each material touching underwater (including character parts and anything thrown underwater).
- Difficult to iterate (changing material function affects many shaders)
This method appears to be the easiest solution to work while also producing some of the best results.
Pros:
- Full access to G-buffer and world position, for proper lighting, normals, and effects
- Full RGB color
- PBR custom solution that respects roughness, metallic, and specular terms with Lambert diffuse and GGX Specular
- Appropriate diffraction - Red bands appear further from the light source than green or blue
- Appropriate diffusion - Caustics blur deeper into the water.
- Quality - Uses a single uncompressed grayscale caustics texture and normal map. Looks perfect.
- Performance - 0.3 ms on RTX 2060 Super at 1440p. Cost scales with resolution.
Cons:
- Does not respect shadows - Without access to UE4's calculated shadows, the only way to create a shadow solution is to run on top of the engine solutions
- Does not respect POM depth - Same is true for all but the hard-coded material method
- Limited PBR access - While full access to the G-buffer is available, coding proper subsurface terms prove challenging without custom code and taking a heavy performance hit
- Shines through translucent objects - Possible to code out, but takes a heavier performance hit
This is the full PPM shader, which I'm not using all of.
The light direction shear - this is what makes the texture look like it's being applied from the light source. We need the inverse XY vector from the light source, multiplied and added to the different world position XYZ channels in this manner. Instead of using a standard world position, using this for the texture mapping gives us the planar-mapped look.
Every good caustics system has distortion and panning. This allows the caustics to appear shimmering in motion. The shear from above is plugged into the mask, then scaled for both the wavy distortion normals and the caustics textures. Getting the scaling and numbers right is tricky, but the goal is to get as much resonance between the distortion and caustics as possible: the gaps in the caustics should get filled with light as the texture distorts. The shimmering here looks extremely good in motion.
The world position depth is used for a variety of calculations - cutoff between underwater and the surface, the blurring of caustics deeper in the water, etc. The interesting calculation here is a simple factoring of the light vector into the separations - this allows us to push the red band further from the light source, and the blue closest. These two are multiplied.
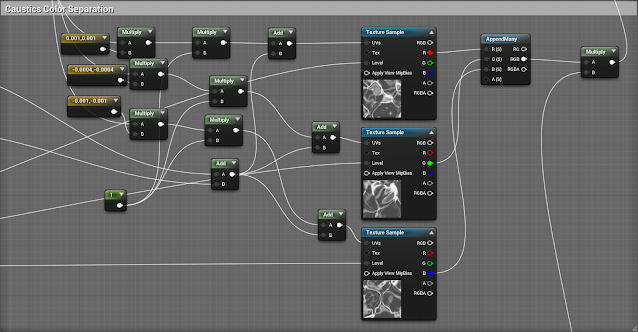
The actual diffraction of the caustics occurs here - All three textures are actually the same uncompressed grayscale caustics texture, but each one is shifted in a certain way based off of the position of the light source and the depth calculated earlier. This shifting causes red and blue and sometimes green bands to appear. This gives the caustics its colors and behaves more accurately than other systems. The multiply 1 chain can be used to scale the whole system.
All the textures are set to use a specific mip level based on the depth. This is what causes the blurring deeper into the waters. Additionally, the caustics texture is set to Blur setting 1 so we can have the highest quality blur and most consistent blending possible.
We add this to the terms above.
Here's where the PBR magic happens - We have the light vector, and with the G-buffer we have most of the same tools given to the engine's shaders to create a physically based system that respects the color of the sunlight, color of surfaces, roughness, metallic, and specular proprerties. As the surface gets more metalic, the color of the caustics light begins to take on the base color of that surface. The Lighting model function includes lambert diffuse, and various specular functions, but I use UE4's GGX function in a custom node to get bright highlights. This is the aspect a lot of people miss, and they end up making caustics that look stickered-on. This system tries to recreate UE4's render pipeline as much as possible.
And the results absolutely speak for themselves.
Note - To get bloom, TXAA, color grading, etc, in the material set > Post Process Material > Blendable Location > Before Tonemapper.
Performance: 0.3 ms on RTX 2060 Super at 1440p.


